Something I read recently on a forum :
Q: How do you make a small fortune in  photography ?
A: Start with a large fortune !
I think that describes it for many of us :)


Photography doesn't always have to be serious . Occasionally I play around with ideas and they don't necessarily have to be technically 'good' images to get a good reaction from people which is what you eventually come to learn about people photography . People don't care so much about the quality of the image , whether there is noise or not - they don't ask what iso you used - as long as there is some emotion or a unique occasion captured .

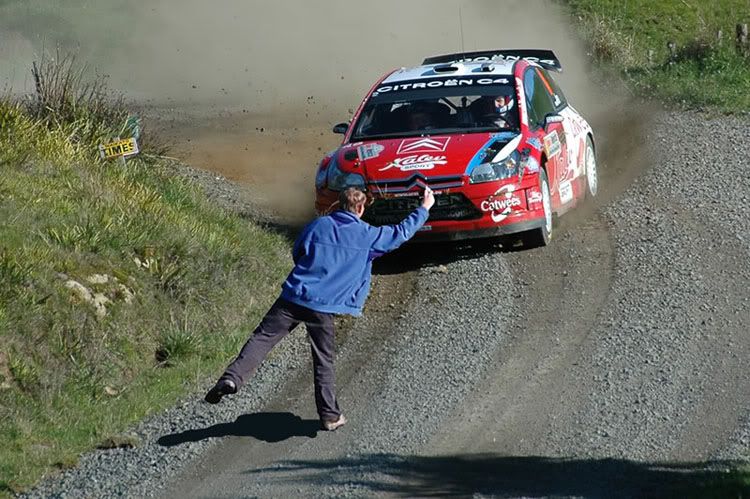
At a rally event we were set up a few hours before the event started because we were 'locked in' to the area . An hour before the event started I put the camera on a tripod and took pictures of myself in various poses on the road . When the cars started coming around the corner I took more pictures of the cars from the same tripod setup .
Later I blended some of the pictures together for some interesting results :


Chimping is dangerous !


Keen spectator !

This one earned me a few insults from people who saw the image later and never knew it was doctored ! :D


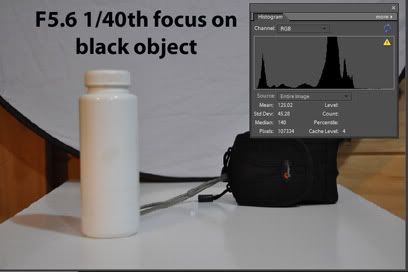
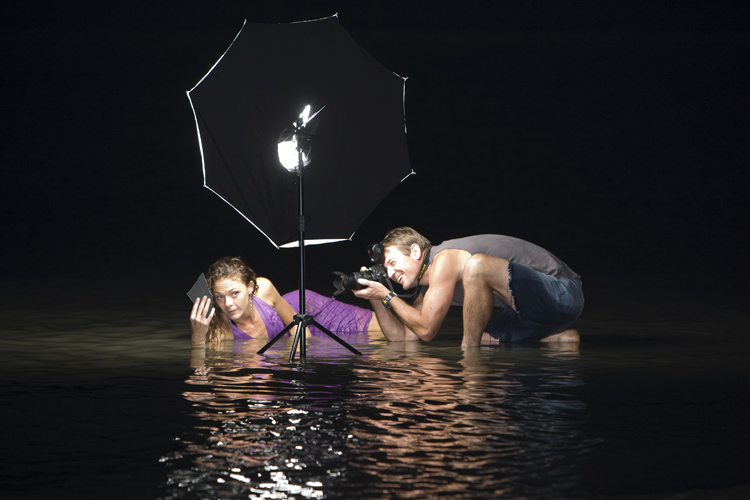
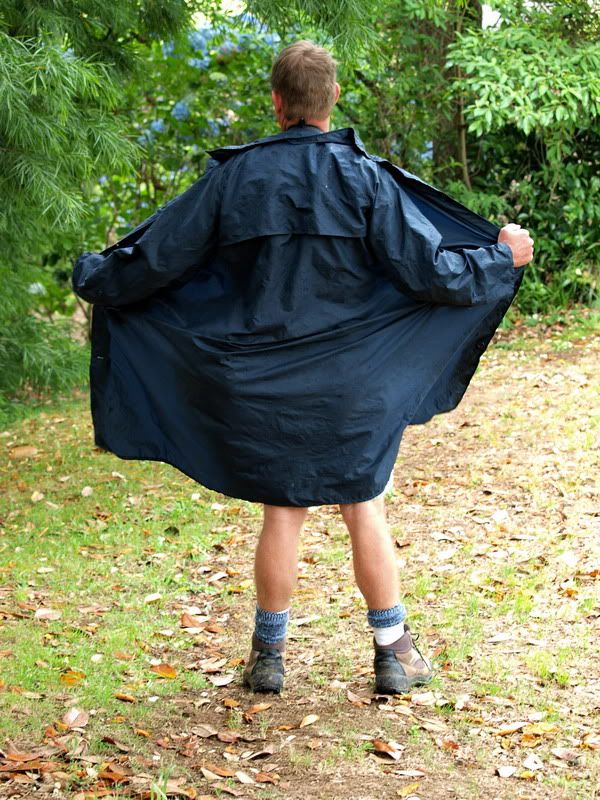
At a park one day a mate and I were snapping pictures in bad weather when he told me my outfit warranted a 'specially posed ' picture with my pants rolled up . I posted this on one forum and asked " is this picture 'over-exposed' or is there too much 'flash' ? "


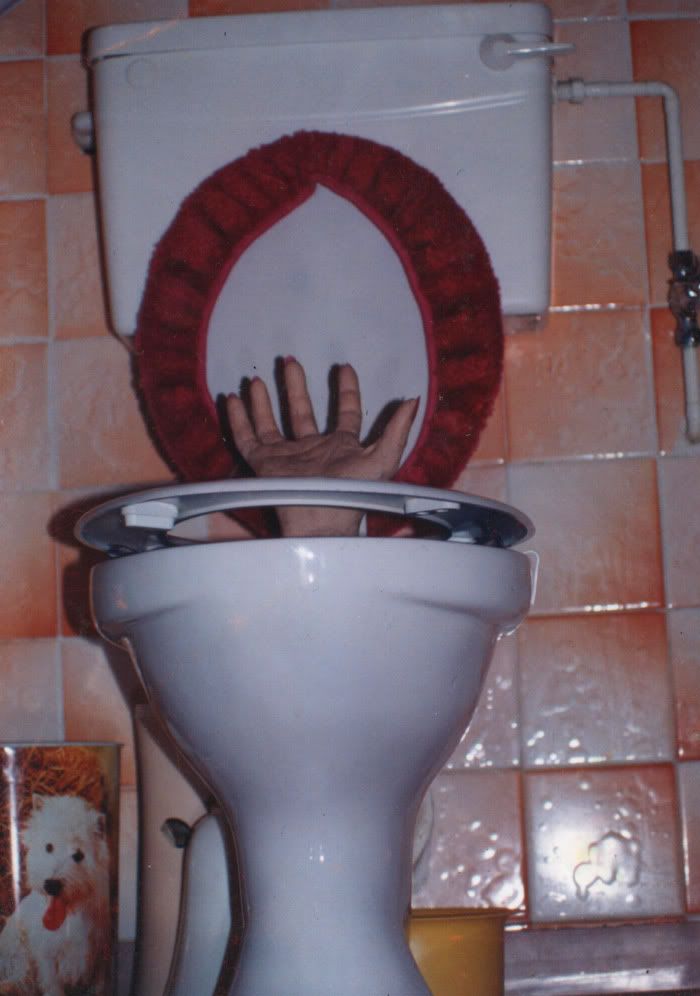
This was done years ago with film . I spent 4 hours making that hand out of flesh coloured plastercine and finally set up one photo [ I couldn't afford much more back then :) ] .
The interesting thing is that after all that hard work a few people have mentioned " The look on that dogs face is priceless " "


Exposure


Beginners " I just bought a DSLR " version :


To get the correct exposure there are three variables you need to be aware of :

1.) Aperture : The opening that lets the light through the lens .

Small number = large aperture ........ and large number = small aperture .
This terminology was badly named and causes much confusion amongst beginners .


2.) Shutter speed : Perhaps the easiest to understand - if the aperture is a tap then shutter speed is the amount of time you keep the tap open .

To get the correct exposure , or fill a glass of water , you have to make sure that your aperture and shutter speed settings give the same results with any combination of these settings .
Open the tap wide to F2 and you will only need to keep it open for one second to fill that glass . Close the tap to F16 and you will suddenly need to keep it open for 32 seconds to fill that same glass !

Key point : Aperture and shutter speed determine how much light you let into the camera

Just keep something in mind for when we discuss "depth of field " ... [ dof ] in future . The tap on the left illustrates F2 with the 'light' gushing in at all angles while the tap on the right illustrates F16 with the 'light' coming in much slower but at a sharper angle , this may help you to picture in your mind why pictures at F16 look sharper than pictures at F2  .


3.) iso : This is an electronic setting in the camera that "amplifies the signal " you let in with the other settings . The other two settings control " how much light you let in " [ " How strong your ''signal' is " ] while iso is like the volume control on your radio , when you have a weak signal you have to crank it up to get the results you need . If it is a very weak signal you get ''hissing'' in the form of "noise" which means lower quality ..... but you can't always control your light source so sometimes this is the only option to get the results you need .

Most radios have circuits to suppress the hissing by filtering out anything that is not the 'radio station' that you are tuned in to  . In your camera this is your 'noise reduction' setting . But when the signal gets extremely weak it reaches the point where the radio doesn't know what is the radio station and what is 'hissing' and eventually when you have a really weak signal you can hear the music and loud hissing  because they are equally strong . 
In your camera this is when you see bad noise in the image .... you're not letting enough light in . See " exposure and noise " .
These two images were both taken at iso 3200 , the one on the left was taken at a faster shutter speed and let in less light so the 'hissing' showed up a bit too much , the one on the right was taken at a slower shutter speed so the sensor received a 'stronger signal' [ more light ] which overpowered the  'hissing' which was still present , the 'signal' was just stronger than it  .


Key point : Iso decides how much electronic amplification you perform on that light you receive from the other two .


The next step : "I understand the basics and want to know more " .......

[ If you understand the above then read further . if you don't then contact me and let me know how I can improve the explanation . ]


Have a play with settings on the 'virtual camera'

1.) Aperture : they made it really complicated by naming apertures the way they did [ big number small aperture , small number big aperture etc. ] .
It is basically a ratio of the diameter of the aperture to the focal length of the lens . It would have been easier to understand if they named F2 something like F1/2 and F4 as F1/4 because they are ratios .


Have another look at this lens . It is a 50mm focal length which means that F1 would be an aperture with a 50mm diameter  [ 50 X 1/1 ] .

F2 means the diameter is " 50/2" mm wide or 25mm . [ 50 X 1/2 ]

F4 means the diameter is "50/4" mm wide or 12.5 mm . etc . [50 X 1/4 ]


To go one step further before anyone starts thinking that F2 to F4 is one "stop"difference [ a "stop" is either half the light or twice the light in either direction ] , let's look at the area factor .
Working with circles and calculating area makes things even more complicated so I've compared it using squares : If F2 is a diameter of 25mm and F4 is a diameter of 12.5 mm then F4 is half the diameter of F2 but due to the fact that we are working with area it is actually 1/4 the area
.

So : F2 lets in 4 times as much light as F4 , F4 lets in 4 times as much light as F8 etc . which leads us to the next step .
I used numbers that simply made it easier to show calculations and they are two stops apart from each other . This is what a 50mm F1.8 lens looks like .
Since it starts at F1.8 they show that at the bottom of the scale so you know the maximum aperture , realistically they should have F2.0 on the scale .

The aperture scale goes 1.0 , 1.4 , 2.0 , 2.8 , 4.0 , 5.6 , 8 , 11 , 16 , 22 , 32 ....
You'll notice that the numbers don't make much sense one after the other but each second number is doubled [ 1.0 , 2.0 , 4,0 , 8,0 .... as opposed to 1.4 , 2.8 , 5,6 , 11 , 22 ..... ] .
This means that if you double any aperture you are working with you are changing by two stops [ 4 X or 1/4 the light either way ] .
Going from F2.8 to F5.6 means you are taking in 4 X less light .
Going from F5.6 to F2.8 means you are letting in 4 X as much light .


Now some more about iso :
I took these pictures on an 'F11' day [ see "sunny 16" rule below ] all at the same iso , F11 and varying shutter speeds to show why you get noise at higher iso's .
Here's the 'correct ' exposure at iso 100 , a good setting for high quality images with most cameras . { a side issue is that the base iso is 200 for most Nikons so iso 100 is not the best quality setting for these cameras }


Now to give an idea as to what you are doing to your poor camera when you use iso 3200 we go to 1/3200th sec and divide that light by 32 essentially . This is what the sensor 'sees' at these settings .....

As you can see that image was still taken at iso 100 but it is showing you how much actual light you are letting in at that aperture and shutter speed before the camera has to try and make it look correctly exposed with the iso setting . If I had taken it at iso 3200 it would have looked similar to the first image , but with more 'noise' .
You are essentially using your aperture and shutter speed to let in 32 times less light than needed for a correct exposure and telling the camera electronics " here , amplify this 32 times and give me a correctly exposed image " .
The newer cameras are getting quite good at higher iso's but only use them when necessary , perhaps when you have 32 times less light to start with and have no other option but to 'amplify ' that signal for acceptable results .


The " Sunny 16 " rule

It may sound strange but learning the " sunny 16 " rule helped me understand all of this better .
"Sunny 16" is a "pivotal point" to me in that many calculations can be worked out from this rule .
The rule states that 'if your iso and shutter speed are equal then on the clearest sunniest day you can get you will get correct exposure at F16 ' .
Something like this :

iso 100 F16 1/100th/sec
iso 200 F16 1/200th/sec
iso 400 F16 1/400th/sec
.
.
iso 3200 F16 1/3200th/sec .

These will all give the same results and when you think about it this shows us how much easier it is to work with shutter speed and iso than the crazy numbers of aperture .
It's like this , on your camera a shutter speed that shows "200" is actually 1/200th sec .
iso 200 X 1/200th = 1
iso 400 X 1/400th = 1
iso 3200 X 1/3200th = 1 etc.

Now go outside on a sunny day and try it . Set your iso and shutter speed to "200" [ base iso for a Nikon ] and see what aperture you need to shoot at to get correct exposure . Quite often you will find that you need around f11 even on a sunny day because you very seldom get a perfectly clear day . This means that the day is half as bright as it could be because F11 is actually one 'stop' above F16 [ it's twice the area and therefore lets in twice as much light as F16 ] , usually due to haze that you don't even notice in the air .

If for example you find that the camera chooses F8 when your shutter speed and iso are the same then that means there is 1/4 the light as  on a 'sunny 16' day [Since F8 and F16 refer to diameter ratios the actual area ratios will be the square of that , 1/2 the diameter ( 8/16)  = 1/4 the area ]


This can be very useful to remember - you are going to a sports event wanting to know what shutter speed you will be able to use , or shooting an outdoor wedding and wanting to use flash and you can do some calculations at home .
For the sports event the 'best' lighting you can hope for will be 'F16' at equal iso and shutter speed so you know that , at best , you could shoot .....
at iso 200 F16 and 1/200th
or iso 200 F8 and 1/800th
or iso 200 F4 and /3200th ......

If it is a hazy sunny day then you can work around F11 with the same figures

iso 200 F11 and 1/200th
iso 200 F5.6 and 1/800th
iso 400 F5.6 and 1/1600th

For the wedding , if you know your maximum synch speed for your flash is 1/200th then with the 'worst ' lighting for flash [ an ' F16 ' day ] you will have
iso 200 F16 1/200th which needs a lot of flash power [ see high-fp flash ]
By putting your camera at these settings the night before , and then looking at the back of your flash to see what working distance it tells you that you have , you can get a good idea how close you will have to be to people to get the flash exposures you want , at worst , if it is a very bright day .
Considering the fact that you will probably be shooting at -1.7 mainly as fill-flash you can almost double that distance that the flash head tells you - because TTL flash assumes it will be the only light source while you will only be wanting it as fill flash .
Most of the time you won't have more than an ' F11 ' day but if you want to under-expose the background by one stop for a better effect you will be back at the 'f16' settings .
Anyway some will say that the ' sunny 16 ' rule for making calculations on the day is obsolete with modern cameras - but it sure comes in useful before the day to work out what you might be up against :)


If anything is unclear please let me know so I can ' fix ' it :) .


Dance photography

. D90 , 17-50 Tamron F2.8 matrix -2 EV .


The type of dances I have photographed in the past have involved rapidly changing lighting . Now if you are very proficient at manual then by all means shoot manual !
But I can't shoot manual like I drive a car yet [ perhaps that's fortunate ! ] .
So I decided to share my experience with dance photography and my 'safe' settings .
Firstly I shoot in matrix metering most of the time - it overexposes in these 'dark' conditions [ see " 3D matrix metering " ] but it is consistent with its over-exposure and generally one exposure compensation adjustment covers all scenes .
With red lighting you will need about "-3" because something about red lighting really confuses the metering system . With all other lighting I have found that matrix-2 EV compensation gives me a 99% keeper rate .
There's not much point in me shooting manual when the lighting changes so rapidly - I would miss too many shots trying to adjust for the lighting as it slowly , then quickly , changes .
I set my camera to 'S' " shutter priority [ 'Tv' time-value for canons ] at 1/125th sec and leave it to adjust iso and aperture to suit the conditions . At these settings I generally have enough speed to catch the motion , the aperture opens to its widest [ F2.8 with my 70-200 VR ] and then adjusts iso accordingly . If it gets to the stage where it is at iso 200 and there is enough light it will then start closing the aperture down - it always adjust for the lowest iso first then adjusts aperture afterwards .
This way , when the lighting gets really dim , I never have motion blur so that when it is at 1/125th , F2.8 and iso 3200 and the lighting goes too dark for the correct exposure it can't go any further and the picture looks a bit darker - but if it has reached those settings then the picture is supposed to look dark anyway and it looks right generally ! Like this .....


The iso was at its highest [ 1600 for the D40 ] , the shutter speed was at 1/125th where I set it and the aperture was at its widest [ F2.8 with the 70-200 ] . I was in centre weighted mode since the longer reach of the 70-200 means I can generally fill the frame with the subject but the point is that the camera still complained that it was way under-exposed and would have used a higher iso if possible - meanwhile the picture looked as I wanted !
It also means I don't have to wait for a 2 second exposure to finish if I was using aperture priority instead .
If you can do it shooting manual then go for it but when things are moving quickly sometimes it is good to know what a 'safe' automatic setting is .

With the Nikon D90 I can now set the display to show me the iso in the viewfinder so when someone really starts running and jumping around on the stage I can increase the shutter speed and watch the iso at the same time so I know what speed I can go up to for reasonable results . Low light photography is all about compromises , sometimes it is just better to get the shot at 1/250th and iso 3200 than have a blurred picture at 1/60th and iso 800 while trying to avoid noise .


With regard to processing all I have done with these shots is a levels adjustment -I simply move the left slider control [ which controls the dark areas ] toward the right and it makes the black areas properly black and kills the noise in those areas .

Occasionally the lighting will get good enough for the iso to drop to 200 ...


I also have a lens on each body - I don't like changing lenses !  The D50 does a pretty good job as well ......


Just a warning with regard to red lighting . The metering system battles with red lighting though it doesn't seem to mind a red background like this ....


.... it does tend to over-expose reds when the actual lighting on the subject is red . Something about the metering causes more over-exposure with red lighting so you will need to dial in at least "-3" EV if you are using the matrix metering settings I have mentioned in these conditions .
As you can see the reds are still over-exposed at matrix-2 in the above picture - a lesson I learned at the last dance shoot ...
.


Learn you use your head !


Nikon Metering - 3D matrix metering

The Nikon equivalent of "pattern" metering on other cameras has some interesting characteristics to be aware of . First of all it is called "3D colour matrix metering " for a reason . Hopefully these pictures will illustrate the point I am trying to make without too much talk . [ Taken with a D90 - each model varies slightly with matrix metering ]


These two pictures don't look much different though the one where the focus point is on a dark object is slightly brighter , however all the white in the scene causes some under-exposure in both images....


But watch when there is a lot of black in the scene ....


Simply moving the focus point to a dark object changes the exposure , by up to two stops in some scenes , for exactly the same scene with matrix metering . It seems to react more strongly to 'shadows' when it exposes .
Also the fact that they are at different distance from the camera causes a bigger change - when they are the same distance the "3D" aspect exposes similarly for them .
Matrix metering works quite well in most cases but when you have a high contrast situation be careful of over-exposure and learn how to use exposure compensation .

Here's a real world example . The same scene , taken using a tripod , and all I've done is move the active focus point ! ....

Focus point on the left .... 1/125th sec


focus point on the right .... 1/500th sec .... 2 stops difference !


Inverse square law

I know this isn't a perfect test but I decided to include some sort of illustration for the inverse square law and flash falloff .
We have three squares of paper , each 'one cd cover' away from the other and from the light source . The first one exposed at 1/1000th sec using spot metering . The second one at 1/250th [ 1/4 the brightness though it is only twice the distance from the light] .
Technically, with an even light source , the third one should have been 1/111th of a second but was 1/125th .


The inverse square law states that twice the distance from the light = 1/2 squared = 1/4 the power [ needing 4X the exposure ] .
Three times the distance = 1/3 squared = 1/9 power [ needing 9X the exposure ] .
So the first one needed 1/1000th sec exposure , the second one needed 1/250th [ 4X as long ] and the third should have needed 1/111th sec [9X as long ] .

If a square is moved twice the distance away the sides look half their length , 1/2 the length X half the breadth = 1/4 the area .


Three times the distance away they look 1/3 of their length and 1/3 X 1/3 = 1/9th the area .


So when we have twice the flash power we can work at 1.414X the distance [ 1.414squared = 2 ] . We would need 4X the flash power to work at twice the distance then
.

Aperture


Aperture is probably the first subject I would discuss with a beginner because that determines how much light you will let in " mechanically " [ before you start adjusting the other settings ] , and the depth of field you choose is often what most photographers worry about when taking pictures .
Aperture is an opening or hole in the lens that lets the light through . The size of the aperture you choose determines how much light you let in , and the side-effect , sometimes the primary objective though , is that it affects the depth of field .
They make it complicated by stating the aperture as a " ratio of the focal length of the lens blah blah blah ......" , nothing you have to know to get good pictures . But knowing that the smallest number is the biggest aperture and the biggest number is the smallest aperture is what's most important , along with knowing the effect they have on depth of field that is .
Here's a 50mm F1.8 lens at various apertures ......

When you are looking through the viewfinder you are always looking through at the widest setting . So with a 50mm F1.8 lens things look bright even at F22 , because the lens stays at F1.8 until you press the shutter release button , then the mirror lifts , the aperture closes to the setting you have selected , it takes the picture , and then goes back to 1.8 and everything still looks bright in the viewfinder . If your camera has a 'depth of field preview ' button then pressing that 'makes everything go dark ' because it closes to the aperture you have selected ... as your eyes adjust to the light you will see more of the scene 'in focus' , similar to what you would see in the final picture , which is why it is called the 'depth of field preview' button of course !


Imagine pressing the 'depth of field preview ' button at f22 - that's how much less light it is letting in ! But look how small that aperture is , now any light reaching the sensor leaves the aperture blades at a smaller angle , so when you are focused on something things in front of and behind the subject look more in focus because it takes longer for the out of focus circles to get bigger .....


Depth of field is best demonstrated with pictures -
F2.8 is a 'wide' aperture { 1/2.8 of the focal length technically } and is the widest on the Nikon 70-200 F2.8 VR lens - it lets the most light in , and has the shallowest depth of field .
I focused on the yellow peg 1/3 of the way into the scene for a reason . [ 1/3 of the way into the scene is a very approximate statement - it can get very technical but it is somewhere in front of halfway into the scene for general photography ] . Watch as the aperture closes how they all start coming into 'focus' , one in front and two behind . Watch the trees in the background as well .


Remember our tap and the glass of water from the 'exposure ' discussion ? When we open a tap really wide the water gushes out at all angles - it does the job faster but things look a bit messy ... but perhaps that is the way you want them to look ! It depends what effect you are after for each particular situation :)
Now one peg in front of the yellow one and two behind it are in focus which is why many people say you should focus approximately 1/3 of the way into the scene - it's the best distance to focus on at these distances to get as much of the scene as possible in focus when you reach the critical aperture , without having to close the aperture any further . Perhaps the bridal party lined up for a picture where you want them all in focus - you wouldn't focus on the closest one , or the middle one , but rather in front of the middle person , approximately 1/3 of the way into the ''subject'' being the line of 10 people - then you would still have to close your aperture down to make them all look in focus . Experts will tell you that there is a special formula to calculate the actual hyperfocal distance ..... update : 13/01/2010 someone has offered to write an article on hyperfocal distance for me to explain that aspect better and I will post it when it arrives because I don't know everything about that topic ;) .
but approximately 1/3 of the way into the scene is good enough for most of us who don't want to carry a calculator to get that extra inch of focus .

Now if we are talking about taps and water again when you have the water coming slowly out of a tap the angle that the water comes out is much narrower and smoother and it looks 'crisper' , much like shooting at smaller apertures ...... it just takes a bit longer but provides sharper results - again , depending on how you want the image to look or whether you can afford to be fussy about the time it takes .


Eventually all 3 in front of the yellow peg look in focus and the 6 behind look in focus . In reality they are not in focus , they're just 'less out of focus' than they were .

Also the trees in the background are starting to look more in focus . If I had focused on the first peg I would have had to go to a much smaller aperture to get the back one in focus as well but focusing part of the way into the scene [ the 'scene' being the row of pegs ] meant not needing to go any further than F13 . realistically with digital you are not supposed to go past F11 because diffraction starts interfering - like looking through squinted eyes , your eyelids [ the aperture blades ] start interfering with the picture but that's another one of those subjects that is nice to know about but not necessary for getting good pictures - as long as you know about it and stick to the guidelines as much as practically possible . [ perhaps someone could submit an article on 'diffraction' ]


Hyperfocal distance

HYPERFOCAL DISTANCE. What is it and why do I care?

We all know that, before we press the shutter release, the major subject of our photo must be brought into focus. These days we nearly always allow the camera's autofocus mechanism to take care of the job for us. However there may be circumstances when that is not the most advantageous method. In particular, on those occasions when we wish that, not only the major subject, but also objects well behind and objects to some degree closer than the subject also be acceptably in focus. This is particularly important to landscape photographers, but is often useful in other types of photographs.

We also know that, when we are focused on a particular subject at a specified distance, there is a range within which other objects, (both further and closer than the set focal distance) will also be in focus. We call that range the depth of focus (DOF). One of the first lessons we learn is that we can influence the size (depth) of that range by our choice of aperture. What is often forgotten is that the focal distance we (or the autofocus control) have set is equally influential in determining the DOF. Just as decreasing the size of the aperture increases DOF, increasing the focal distance increases the DOF.

On those occasions when we wish to achieve the absolute maximum DOF we would first choose as small an aperture as practical (given the other considerations which govern choice of aperture). But what do we do about focal distance in order to maximize DOF?

The laws of optics dictate that, for a lens of a given focal length set at a given aperture, there is a distance known as the hyperfocal distance (H) which, when the lens is set to this distance, will produce the absolute maximum DOF. Specifically, when the lens is focused at this distance (H) the DOF will extend from H/2 (half this distance) all the way to infinity.

So does this mean that, to achieve maximum DOF, we should always set our focus to the hyperfocal distance? Definitely not! Let me give an example:

For a 50mm lens at f/5.6 the hyperfocal distance is 15 meters (~50ft). Thus if we set our focal distance to 15 meters, our DOF will extend from 7.5 meters to infinity. You can't get a larger DOF with that lens at that aperture. But if our principal subject is only 5 meters away it would be significantly out of focus, and we would be badly disappointed with the photo. On the other hand, if our principal subject is 10 meters away, he (she or it) will be in focus and we will have maximized the DOF. For comparison it is interesting to calculate the DOF if we focused exactly on our subject at 10 meters. In that case the DOF would extend from 6 meters to 30 meters. The nearest point in focus would be a bit closer to the camera but the distant background would be very much out of focus.

So we can arrive at a general rule: If the nearest object you want to be in focus is a bit further away than H/2, and you wish to achieve the maximum DOF, set your focus to the hyperfocal distance.

Obviously the next question is: How does one determine the hyperfocal distance? Sadly, I must report that there is not a quick and easy answer. Back in the days of manual focus lenses, most lenses had a DOF scale engraved on the lens barrel between the aperture ring and the focus ring. All one had to do is turn the focus ring until the infinity mark lined up with the index of the aperture being used. Presto, your lens is focused at the hyperfocal distance.

Lens with dof scale showing Hyperfocal distance for F22

With the advent of auto-focus lenses this DOF scale has disappeared (on most lenses). Even worse, the focus throw of AF lenses is so short that it is very difficult to accurately set the hyperfocal distance (or any given distance), even when that distance is known. Still, I recommend that you use any one of a number of on-line DOF calculators which will compute the hyperfocal distance when you input the lens focal length and aperture value. Make a small chart to carry in your camera bag.


submitted by ' blumesan ' of www.photocamel.com

Exposing for bright subjects.

To repeat myself, as I did when I discussed the "sunny 16" rule, this is not intended for the seasoned shooter but rather for the newcomers to photography that want to understand how the exposure meter in their cameras work. In that post, a few weeks ago, I said that you can set your expensive camera to AUTO and matrix metering and make, that expensive camera, a glorious point and shoot one.
All
exposure meters, regardless of price, are designed to read the light from a scene and average that light to reproduce the subject as a middle tonality. What I am saying is that a reflective light exposure meter, like the one you have in your camera, will assign a middle tonality to the subject it is pointed at.
It is obvious that if your subject is of middle tonality all you have to do is to follow the meter but if it is not, then you have to add
compensation if the subject is bright and subtract it if the subject is dark. If you follow the meter for those subjects you will end up with middle tones or to be specific, overexposure for dark subjects and underexposure for bright ones.
You have 3 different meters in your camera. Matrix is the most sophisticated and to me, the least reliable. I say that because we know that matrix automatically compensates the
exposure but nobody knows by how much.
You could like the results but the opposite could also be true. You, as a photographer, are not in control.
I was educated using hand held
exposure meters many years ago. Then we had center weighted metering and finally spot, the most precise meter for the seasoned photographer although it requires care to yield excellent results and that comes with experience.


This is a picture of a white heron photographed with my D2H and the 70-300 VR lens. In the early morning light, using manual mode, I selected spot metering and metered from the bright feathers. To bring back that brightness I opened up 1-1/3 stop and in Photoshop I made a slight adjustment level to place the bright areas close to the last vertical line on the right side of the histogram without clipping.
If I had used slide film then I would have added 1-1/2 stop of
exposure compensation, sometimes 2 stops, to get details in the feathers. When I talked about the "sunny 16" rule I showed how to expose bright subjects properly using that rule.
Center weighted measures 75% of the sensitivity in the center but bright or dark tonalities outside the center can fool the meter.
Once you develop the good habit of learning to accurately expose your subject you should see a great improvement in your photography.

William Rodriguez


Understanding photography

This site is an attempt at collecting the best photography tutorials from the forums for quick reference , and will hopefully become a good site for beginners who want to know what 'aperture ' , 'iso' and 'shutter speed' have to do with "Exposure" - besides many other interesting topics .
I've added a few articles on the right and invite submissions from those of you interested in sharing any useful tutorials you may have .
Perhaps we could have a place to store all the best tutorials from the photography forums for easier reference !

 
I'll teach you how to do this as well :)


And this ....


First of all if you are a beginner you are probably confused by all the terms used and may have just bought your first DSLR [ Digital Single Lens Reflex - basically one of those cameras that let's you change lenses  ] .
How many megapixels do you need ? Any camera you buy today has more than enough so don't even worry about how many a camera has - have a  look at this site megapixels compared . There was also an excellent comparison done called digital vs film where a 12 meg image was blown up to the size of three storeys on a building ....  6 meg is more than enough for most people then ! 

If you have a compact camera you will benefit greatly by getting a DSLR regardless of which has more megapixels . Besides the many technical differences , if you have a DSLR your investment in lenses will possibly be worth the same or even more in 10 years time , even though the body of the camera will be worth very little by then . 
The compact you buy for $500 today will be worth $20 in ten years if it's still going - who would buy your 12 meg compact when they have 45 meg compacts to try and give people a reason to upgrade all the time ?
If you have more money than brains then keep upgrading , it's good for the economy and the second hand market , otherwise don't 'upgrade' unless you earn a living from your photography and know why you need to upgrade .

I took this in broad daylight with an old 6 meg compact and an even older Nikon SB24 flash to illustrate the fact that a 'better' camera does not mean better pictures . Understanding means better pictures !


With the correct understanding you can take an old truck starter solenoid and use it to trigger the flash while it destroys a light bulb ....


It's also more about having the right gear for a situation than having expensive gear that is too specialized to do a job you weren't expecting it to be used for .
Some of my favourite images were taken with my 6 meg D40 and the 18-200VR 'super zoom' lens . Why ? because I didn't know what I would be photographing and left the bigger cameras with their expensive  lenses with limited range behind since the 18-200 covered the full range , and nobody has ever questioned the quality of this lens without examining two identical images side by side with a magnifying glass .... if you're shooting landscapes mostly at F11 you won't notice the difference between this lens and a $4000 lens - you are more likely to be biased by an exposure error of 1/3 of a stop between the two images , or a slight difference in white balance between the two , so unless you have more money than brains or actually need F2.8 or faster glass save your money .   
 Patea , Taranaki , New Zealand.

 This next image may not be stunning  but it shows what you can do with a versatile lens like the 18-200VR , after taking the wide angle shot [above] you can immediately zoom in for a closer view of something in the same scene . There's not much sense obsessing about the image quality of lenses that can't do this for you when you need it !

With this image I had been shopping , the D40 and 18-200 lens was  on the seat next to me as always [ I wasn't planning on any photography ] and I saw the sunset starting to appear . If I had my D90 and 70-200VR lens I could not have got this shot - so always be prepared for all situations when you don't know what you will be photographing , a super-zoom is better than an expensive prime lens in these circumstances .
Raglan harbour , New Zealand
 I read an interesting quote the other day and it went something like this : " It is a thousand times better to have common sense without education than to have education without common sense . " !
There are plenty of people out there who know it all ! They can quote manuals and page numbers and specifications  and famous people who have made statements about a topic being discussed ..... but they can't go out and take a few pictures and work out the answer for themselves - and quite often they eventually find out that the famous person who made a statement that they base their pointless arguments on  was quoting someone else who turned out to be wrong and has just admitted it :( .
Don't believe anyone , not even me :) , if the statement makes sense and the results appear to confirm it then it is probably correct - but as soon as something doesn't quite add up then do some research , do some tests , post the pictures on the forums and ask questions .... eventually you will be answering questions .
I have found that nothing beats direct comparisons for proving a point . You can argue and discuss one image forever without getting anywhere but a direct comparison of the same picture at different settings says more than a thousand words , sometimes it silences them .
This image is in my blog on exposure and noise


Simply comparing the two images side by side saves a lot of talking and typing .
Even a simple diagram showing the size of the area that spot metering uses saves a lot of talk and mathematical explanations .....


What better way is there to illustrate different size apertures than with pictures!


The area that most flash metering systems uses .... 


And the area that TTL/BL meters off


Whatever you do don't simply accept everything you read here - nobody's pefrect and eveyrone mkaes mitsakes [ ;) ] - there could be a typo that gets overlooked by people who know the answers but trips up a beginner who is not biased by what they already know .
Ask questions , question the answers until you understand them then share what you know !


Also if anyone would like to contribute tutorials to help beginners understand photography please contact me !


-->
Who links to my website?