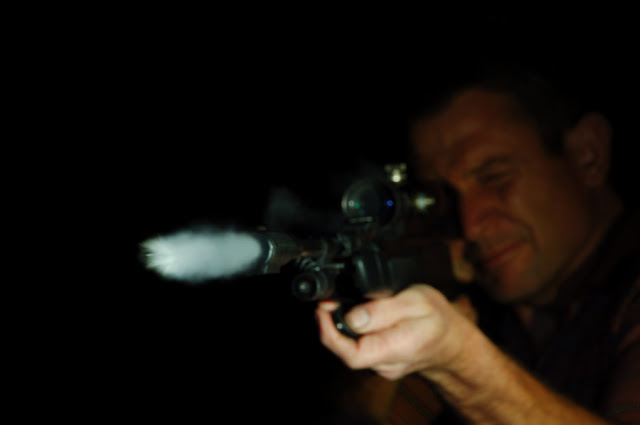
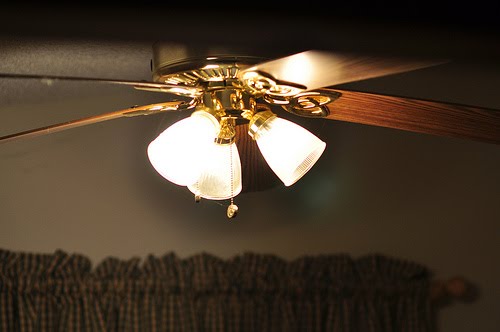
Tonight I lined up the last three eggs with my air rifle . I wasn't expecting much of a show due to the small size of the pellets ..... now I'm washing egg out of my hair and off my lens !
Give up ! There's a saying : " How do you make a small fortune with photography ? ........ Start with a large fortune " !
Actually it's not that bad , just don't expect it to be 'easy money' . At the end of this article I'll let on 'my secret' idea that I know will work .
But seriously , there are ways , but just be wary of how fast things change in this world . They bring out cd's and DVD's . Next thing someone buys a big machine for $50 000 that can "re-surface" your scratched discs and charges $10 a time ..... expecting to make their money back on the machine and make a comfortable living for the rest of their lives . 6 Months later the stores are selling diy repair machines for $19 each , cd's and DVD's are much cheaper anyway and some guy is sitting with a $50 000 piece of scrap metal and $45 000 worth of debt .
Image Libraries :
A few years ago I started submitting pictures to an ''image library " where you could upload "good" pictures you have taken and they would sell them for you for half the profit . I sold one image for $150 and received $75 just before the company went down the tubes because "microstock" companies were now selling the same images for $10 each ... dealing with large volumes at lower prices but essentially making more money by gaining all the customers . Is it an ethical issue or simply the evolution of the industry ? That's a different topic entirely but it is being done and we can't change that . So don't expect any money making venture to be 'secure' because maybe one day people will be giving away images simply to sell advertising on their sites . One good 'side effect' of joining someone like istock is that they are very strict on image quality and you will receive a wealth of information simply on rejections of your images for various technical reasons . If you have the right kind of images you can actually make a living out of microstock but you have to be really good and have the right type of images ... people pictures [ with a signed model release form for each person in the image ] and concepts - things that people will buy for ads and the likes . basically I have about 200 images up on istock and have a balance of $81 after 16 months .... most of my images are landscapes which are easy for almost anyone to take so they don't sell too well . It took hours of uploading and rejections and driving around looking for 'money shots' ..... before I decided to just sit back and leave it as it is for now .
Wedding photography :
I think this will be one of the few aspects of photography where people can still make a living for a while to come . But with more intelligent compact cameras and so many 'advanced scene modes' it is becoming easier for people to think that "Uncle Bob" can do the same job as a professional wedding photographer to save some money . We know that isn't really true but many people are becoming less fussy about image quality as we become a society of people who can take 300 pictures in a day with a compact - And no longer think much of the idea of having the Mona Lisa hanging on our wall all our lives when we can have hundreds of "acceptable quality " images popping up on a digital frame on the wall every few seconds. Either way wedding photography is an entirely different beast and not something you just decide you are going to do next month .... and it's definitely not easy money though you can do well once you are into it !
Event photography :
"Make money from your images , sell your pictures on our site !" Sounds easy and exciting doesn't it ? I once spent a weekend in another town photographing a 24 hour cycle event . I took 4000 images , sorted through them for two days , uploaded 1800 of them , 40 at a time , and 'made' $80 .... or basically recovered $80 of the $200 and 4 days it had taken me .
My secret method :
I've had this idea for a while and since I haven't 'had the time' or 'need' to implement it since I have a day job and my weekend time is precious to me I thought I may as well throw it out there for someone else to use .
Horses , or 'dressage' events involve a compact group of events happening one after the other with a lot of snobby people with more money than brains wanting to show off their wealth ... and ride horses in between . Ok , they're not all like that but there are some like that amongst them .
I was in a store talking to the salesman about photography and making money . He told me the following story ....
" I was at a dressage event firing away /practicing with my camera when a woman walks up to me and says " That's my daughter on that horse - do you have any pictures where all 4 feet are off the ground ?" . I looked through the images and said "yes I do" . She said " How much do you want for that image ?" and before I could answer and tell her she could have it for free she said " I'll give you $300 for that image" ....... I downloaded them to the laptop and told her that there were three to choose from and she said " I'll take all three , I'll give you $900 " ..... I tried to stop my jaw from hitting the floor , burned them onto a 50cent disc and took the cheque ......"
Ok , so that's not going to happen every time but it's one of the few places where it can happen .... people racing bikes and stock cars and skateboards don't usually have spare money for photos .... or they want them cheap - horse events , well that's a very different group of people .
Now I once tried taking my laptop and a battery and inverter with a table ... set it all up , took a bunch of pictures - sold $15 worth of prints [3 at $5 each] to a girl who said " My next event is at arena "D" in 15 minutes if you want to take some more pictures for me " .
I went to the arena , took 70 pictures , we went back to the table and I said to her " This idea of printing is taking too long , I'll sell you the images for $20 each and you can print them later any size you want for cheaper ..... or for $100 you can have all 70 " . She took all 70 and gave me $120 so I could also make her another 4 prints from the images I had just taken so she could "Show her friends" .......
Now that's $135 from one girl after I started figuring it all out .... it was time to start packing up by now but imagine how it could have gone .
So here's my big plan .
You get something like my photovan and either some charged up batteries or a small "quiet "generator to run a laptop or two plus maybe a small printer for 'show off to friends' prints .... and a whiteboard with the arena numbers listed down the left side and the times of the events across the top .
Now you find some other people who want to make some money with their cameras and send them each to an arena .
Write across the top of the board " We have images of the following events " and tick off the boxes of the arenas and times you have taken photos .
Tip: There is usually a car parked at the end of each arena - take a picture of that car before you start and when you finish each event - it will be easier to sort later .
Now you have someone collecting memory cards and downloading images in separate files using the arena numbers as a reference and 'sort by date taken' to keep them in the right order .
When the customers come along you can just charge them $100 , or $200 for all their images on a disc .... 50 cents worth of disc .... or sell them a 4 gig memory stick to add more images to later .
With the occasional prints done at $5 each , you pay your other photographers a whopping 50% of each lot of their pictures sold and if there are 4 of them you make 4 X as much as any one of them .
20 events for the day in each arena ... 80 events at $100 - $200 each ... maybe 'only' half of them sell , but then most of the people there will want to show that they can afford it ........= lots of $$$
I know this will work and do well but there's not much sense keeping it to myself if I'm not going to get around to doing it so all I ask is that you deposit the first million in my account and then you can keep the rest for yourself !
Oh yes - don't ever expect the 'donate' buttons to bring in any money either ;) . Update : 29/06/2010 . I applied for 'adsense' nearly 6 months ago . Every time I checked my submission was 'awaiting approval' . After quite a few questions on the forums I was told to 'delete cookies' and try again . It was up and running in half an hour last night - it's a pretty shoddy setup because I could have probably had it up and running 5 months ago if their program was more efficient , but anyway once you get approval you can earn money from ads on your site - from the last 20 hours since placing ads my balance is sitting at $1.50 - nothing amazing but it's also not costing me anything to earn it so we'll see how it goes :) .
[My new ebook Introduction to flash photography] Firstly , for those who love to sound rebellious by saying "Rules are made to be broken !" [ Try that on one of your male friends with the feminine head tilt ! ] , there is a big difference between 1.) totally ignoring rules and 2.)first finding out what they are and why the work in general and then breaking them for a reason to achieve a particular effect in an image . I just thought I'd add that after some of the responses to this article .
This tutorial was kindly provided by "Benji" of www.photocamel.com of "sonshinestudios" contact him via his website if interested in his DVD .
There are nearly 40 rules (suggestions) that should be followed if one expects his or her portrait images to rise above the "that is a nice picture" to "WOW you did that?" status. I have never seen them assembled into a book and published, other than a book by master photographer Don Peterson written in 1985. He listed 25 of them. Even when Googling it all I get is his rules (posted by myself and one other person) over the past several years on various websites. Several of those rules have become, let's say, "obsolete" in the new millennium. I have garnered these rules over the last 25 years as a professional photographer. Some of them have been modified somewhat by the general relaxation of posing people in the last ten to fifteen years or so.
Why rules in portraiture? Most people would not spend $100.00 for an 8 x 10 snapshot that they could have done themselves with a point and shoot camera in their own backyard. They will however spend $100.00 (or more) for an 8 x 10 if it is a beautiful portrait of their loved one, one in which they look good, and if you follow the rules you should get beautiful portraits. Once you learn them you can then judiciously bend or break them a little to achieve that "perfect" image that you see in your mind.
These rules are for PORTRAIT images. Just as there is a difference between a mini van and a sports car, even though both are motor vehicles, both run on gasoline and both will get you to your destination in comfort, there is also a difference between portraiture and fashion images. In portraiture it is all about the face. In fact the word "portrait" literally means "A pictorial likeness or photograph of a face." In fashion photography it is all about the clothing.
While some rules will be applicable to both fashion images and portraiture some will not.
Rule # 1.* No Sleeveless Clothing in The Head and Shoulders Portrait.* I took the image on the left, cloned her blouse several times in order to cover her right upper arm.* Note the difference as to where your eye is drawn when you view the image. In a portrait the first thing you should see is the face.
Rule # 2. "No shorts in group portraiture."* This happened to me twice this year (for the first time in years!)* Even though we specifically state in our clothing consultation NO SHORTS we still get people who show up in shorts.* When this family called, they said they wanted to be photographed in blue jeans and asked if that is OK.* I said yes and told mom to make sure the shirts/blouses are all the same color.* I of course was expecting long blue jeans NOT shorts.* The image below is one of the poses.* Note how dad's and his youngest daughter's bare legs really attract attention.* That is because our eyes are attracted to bare skin, and that is why the ONLY bare skin that should show in PORTRAITURE is the face. Remember, the FACE is what portraiture is all about.
Next four rules, (since I have two images that show four problems!)
3. Avoid Bright Colors and Bold Patterns in Clothing. The idea of a portrait is to see the face of the subject. Brightly colored clothing and bold patterns draw the eye away from the subject's face. (This is especially true in the head and shoulders portrait.)
4. Avoid Football Shoulders-The body should not be turned straight to the camera.
5. Solid Pyramidal Base - The body should not be turned 90 degrees away from the camera. 45 degrees is usually the ideal angle for the head and shoulders portrait. Posing someone at a 90 degree angle to the camera does not allow the head to appear to have proper support. After posing the subject at a 45 degree angle, bring the arms out to form the sides of the pyramid.
The above rules are true whether you are shooting a head and shoulders image or a full length family portrait. My examples will be of the head and shoulders image. I borrowed* these images from my video "Photographing The High School Senior Girl in the New Millenium."* Also note I broke the "no sleeveless clothing" rule.* Remember, the main thing in portraiture is to keep the main thing (the face of the subject) the main thing.
Lastly, Sit Tall- (Rule 7) Do not allow your subject to slump over or get round shouldered. Note how May has slumped over in both of these images making her look short and dumpy.
Rule # 6, Correct Posing Stool Height- I have found that a 24 inch tall stepladder works wonderfully as a posing stool for nearly all of my traditional head shots, provided my subject is not very overweight. For the overweight subject use a taller stool to allow their paunch to drop. I added a wider top rung (the seat) to the wooden ladder because most people's buns are wider than 4 inches!
In the image I posted below, you can see my modified stepladder.* It also shows how raising the leg closest to the camera will tilt the torso (and the shoulders) slightly away from the camera, which happens to be Rule 9.* This rule applies to females only.*
9. (Females) Lean Slightly Away From The Camera.* I also place a small wooden wedge under the buttock closest to the camera. This will keep the shoulder that is closest to the camera higher than the other one, but will still allow the subject to relax. I added "sides" to my widened top rung with slots on both sides for the wedge to fit into.
Next rule,
Rule 8. Lean Forward Slightly-"Over the belt buckle." This eliminates the static straight up and down look and will give a feeling of movement and motion to the portrait. In the left image below she is seated bolt upright. In the right hand image she is leaning over the belt buckle to camera left and also slightly to the left rear. I then had her turn her head back toward the main light at camera right.
Rule 10. Project The Chin - Especially if your subject has a full or double chin. By projecting the chin out toward the camera and using a slightly higher camera position the double chin can be nearly eliminated. Photoshop can finish the rest!
11. Proper Head Tilt- Never tip a man’s head to the high (feminine) shoulder as he will look feminine. Women's heads can be tipped toward either shoulder, but the feminine shoulder is more appealing.
Female head tilt. Note that the female looks good in either the masculine head tilt, or the feminine head tilt. In some poses the masculine head tilt works better for the female, especially if the background or the set she is posed in is a more masculine background or set.
Rule # 12. Proper Eye Direction-Generally speaking, in males the eyes should follow the direction of the nose.* For females there should be slightly more whites of the eyes on one side than on the other.*
Rule 12a. The eyes should never be turned so far in their sockets that there is no white area on one side, and you should not shoot into the whites of the eyes.* A slightly higher camera angle will give more whites at the bottom than at the top which is more appealing in images of young females.*
12b. The catchlights from the main light are considered correctly placed when they appear at the eleven o'clock or one o'clock position in both eyes. One catchlight is normally preferred because there is only one sun but two or more is acceptable. One catchlight per eye suggests thoughtfulness; more than one creates a look a merriment. In multiple catchlight images the catchlight from the main light should be the brightest.
In the image below the subject is staring up into space. Some wise sage once said; "The eyes are the windows to the soul."* This is not to say that every image must have the subject looking directly at the lens, but it seems most people like images that the subject is looking at the camera (them) and sales data will bear this out to be true.*
Rule 13. Proper Camera Height - Generally speaking, the camera lens should be at about eye level for head and shoulders portraits, chin level to chest level for ¾ length and chest level to waist level for full length portraits. An even lower camera height for heavy set brides, that are posed standing, will make her appear taller and more "regal."
This rule is perhaps the one I break most often. Just as I will not tilt the head of a 60 year old female as much as I will of a 16 year old female, I also don't usually stand on a step ladder or stool to photograph a 60 year old woman, but I do for a girls high school senior portrait. A higher camera position in head and shoulders portraits of high school seniors will give their eyes a more "glamorous" look. If the 60 year old woman wants to look glamorous, I will of course use a high camera position (or if she has a double chin) it all depends of the final use of the image.
In the image below, I broke rule 13. I was on a step ladder about nine feet above the subject in the second image and at ground level for the first image. Note how much thinner she appears in the second image. This works best for subjects seated on the floor. Note how the background "moved up" when I raised the camera position up. You may want to pre-position the background somewhat lower to compensate for this.
Rule 14. Use The 1-2-2 or The 1-3-2 Posing Technique.
This technique is used mostly on younger females and will add that "extra touch" to your images to raise them above what the other guy is doing.* A brief description is in order however.
"The 1-3-2 posing technique is where the body is turned 45 degrees away from the camera and also away from the main light source (position # 1) then the face is turned back beyond the camera position additional 20 degrees or so (position # 3) then the eyes are brought back to the camera position (position # 2.)* The main light is always cross lighting the female form in this technique and will draw a pleasing short light pattern on the face."* This is rather wordy so I will attach several images to show the technique.* This technique can be used for head shots, waist up, 3/4 length or full length poses when seated or when standing and is usually used only on young females.
Benji
P.S. I demonstrate in detail this technique in my video. PM me for further information.
Another, this time a 3/4 length and outdoors.
Another, seated this time.
Males usually look best in the 1-2-2. Females usually look best in the 1-3-2 technique. The images below shows both.
Rule 15. Avoid Flat Lighting. *Portraits usually look best with one side brighter than the other side. *When the shadow side of the face is closest to the lens it is called short lighting. *Short lighting will make the face appear narrower and more slender. *If the shadow is on the side opposite of the lens it is called broad lighting. *Broad lighting will make the face appear wider and heavier. * Flat lighting is where there are no shadows on the face at all. *On camera flash will give you flat lighting. *In the image below, the flat lit image was lit with my home made ring light, the other with a 24 x 32 inch softbox with louvers at camera right.
The main light should enter the same side of the female's face that the part in her hair is on. This will allow the main light to "get under" her hair and brighten up the eye that is on the shadow side (preventing "trapped eye.") Lighting the face this way will also prevent shadows running under her hair along the cheek line.
Rule 16. Watch the Nose and Cheek Line-The face should not be turned so far away from the camera that the nose will break or nearly break the far cheek line. This will make the nose look large. 16 a. The far eye should either been seen completely or not be seen at all, but one should never photograph the face so that only 1/2 of the far eye shows. Note that this pose will also cause the subject's eyes to have too much white on one side of the eye as opposed to the other side of the eye (a violation of rule 12.)
Rule 17. Avoid Clutter - Simplicity is usually best. *For example too many props in one image. A background that is too busy, or in sharp focus. Another one is a brightly lit background, or a background with large areas of bright sunshine or patches of white sky. These things will attract the eye to them rather than to the subject.
17 a. Busy clothing will create confusion for the eye. *The eye should immediately be drawn and rest upon the subject. *Using a telephoto lens with a large aperture will give you short depth of field which will blur the background.
In the left image below, the pattern of the blouse is too busy and the background is too sharp. These two problems have been corrected in the image on the right. A simple blouse change and moving her forward about 12 feet (and stepping back with the camera 12 feet) allowed the background to be softened.* The background could also be blurred in Photoshop if your DOF is more than what you anticipated, but I like to get it right to begin with and leave Photoshop for enhancing. Note in both images the back arm is completely and totally visible. I feel it looks best to have the entire arm visible rather than the upper arm/shoulder area visible then the elbow/middle arm not visible and then the hand suddenly reappearing at the wrist.
Rule 18. Crop Between The Joints, Not At them. Cropping at a joint makes the subject appear amputated. Also when cropping leave room for the subject to breathe (room in front of their face) and leave room for the subject to think (don't severely crop off the top of their head.) Generally if you crop off the top of the head you cannot also crop off very much in front of their face at the same time. If you do they will look crowded in the frame.
Rule 19. Watch Recessed Cheek Line with Glasses. I usually have the subject obtain empty eyeglass frames which will solve the problem immediately. Another suggestion is to shoot at least one image without the glasses which will give you a good set of eyes. You can then in Photoshop add them to the image that the subject has chosen to purchase. This technique will also take care of the distortion caused by eyeglass lens refraction which makes the subjects eyes look larger or smaller than what they really are.
Rule 20. Don’t Overuse Hair and Kicker Lights-The hair light should kiss the hair, not blast it. Same for the kicker lights.
Rule 21. If It Bends, Bend It-This rule is perhaps the single most important rule. 21 a. Wherever there is a joint, “break” it. Combining these rules along with Rule 8 (Lean the body over the belt buckle, Rule 9 Lean slightly away from the camera Rule 31 If the subject has two of them make them different and lastly Rule 32 (A general rule) Avoid 90 Degree Arms will create a very dynamic image devoid of any staticness. These rules are basically true whether the pose is a head and shoulders pose or a full length seated pose.
Note in the posted image nothing is straight (other than her wrists) or straight up and down. She is at a 45 degree angle to the camera, leaning back, her hips are canted, her shoulders are slightly tipped, her head is tilted, her back leg is bent, both elbows are bent, all of her fingers are curled and even her eyes are not straight in their sockets (Rule 12.) All of this bending, leaning, tilting, twisting and turning also helps in following Rule 31, If The Subject Has Two of Them, Make Them Different. Note her hands are not at the same height nor are they across from one another, her elbows are at different heights, her knees (even though you can't see them) are at two different heights.
Rule 22. Don’t Stack The Hands or Clasp Them Together-Seperate them and place them apart and between the joints. Hide the rear hand if possible in group portraits. I've posted three images showing how this rule was broken three different ways. 22a. Don't place an elbow directly on top of the knee. Place the lower arm area that is 1/2 way between the elbow and wrist 1/2 way between the hip and knee. That way the elbow does not end at the knee forming an uninteresting straight line.
Rule 23. Subdue the Near hand-The hand that is nearest to the lens will appear larger than the other hand especially if it is held very close to the lens (foreshortening.) Feet or legs pointed toward the camera will also look elongated due to foreshortening.
23 a. Don't project the hands toward the lens and keep them within the range of focus. 23 b. Generally speaking, if the hand is above the subject's waist, the fingers should be directed upwards.* If below the waist, the fingers should be directed down.* *The little finger side of the hand photograph's best.* I will post an image that does NOT break this rule.
Rule 24. Don’t Photograph The Back of Women's Hands.* The sides are much more graceful than the flat of the hand. 24a. Fists are masculine, open hands are feminine.* Note how much more graceful the edges of the hands of the young lady in the second image looks when compared to the flat back of the hand in the first image. I will post an additional image (a horizontal) in my next posting also showing posing the sides of the hands.
Another pose showing rule 24 and how I posed the hands so the sides of the hands show rather than the flat back.
Rule 25. Place the Weight on the Back Foot- and shift the hips (with standing poses.) This will put the hips and shoulders at a pleasing angle. Ask the subject to point her foot that is nearest to the camera toward the camera and shift her weight to the back hip. *This means the front leg and foot will have no weight on it. *She should then bend her knee slightly toward the other leg. *This will give a pleasing “S” curve to her body.
As you may have already noticed, some rules are for women only, some for men only, some for couples and groups only. Then there are rules for seated poses only, standing poses only and some work best on younger subjects as opposed to more mature subjects.*
Rule 26. (Couples Portraiture) Do Not Photograph Two Heads at the Same Height- Ideally the eyes of the shorter subject (usually the female) should be at about the same height as the mouth of the taller subject.
Rule 27. (Couples or Group Portraiture) Have No Head Directly Above Another-All heads should not only be at different heights but also not directly above (or below) another subject. The eyes of the subject that is lowest in the group should be at about the same level as the chin of the next highest subject. For example in the image below note the eyes of the young lady at camera right are at the same level as the chin of her older sister at camera left. You may have to have someone take off their shoes or stand on something to get this effect. Lots of photographers use old hard bound books with the covers taped together with gaffers tape for this very purpose. On book will raise someone up about 1 inch, 2 books will raise him or her 2 inches!
Rule 28. Avoid Crotch Shots-Raising the leg that is closest to the camera in a standing pose will prevent shooting into the subject’s crotch. *In groups, turning the subject's body to a 45 degree angle and keeping the legs together should prevent shooting into the crotch. *This rule has been "relaxed" in the last decade or so for high school senior images, especially for boys and to a somewhat lesser extent for gals.
Rule 29. Use The Right Key and Good Taste-Generally speaking a subject dressed in all white looks best in a medium or high key background. Conversely, a subject dressed in dark clothing looks best on a medium or dark (low key) background. Note in the above image (the gal in rule number twenty eight above) I broke this rule because she is dressed in black with a black prop but on a white background. Again this rule is frequently broken especially in high school senior portraiture.
Rule 30. If The Subject Has Two of Them, Make Them Different.* Feet, knees, arms, hands and elbows at different levels are more interesting than when placed side by side.* Note in the posted image that everything that can be made different has been made different. His hips are not level, his shoulders are not level, his head is tipped to the masculine shoulder, he is leaning slightly, his knees, feet, arms, hands and elbows are not side by side but are placed at different and multiple levels. Sameness leads to boringness in a photographic image.
After you "rough in" the pose you will most likely want to refine certain things. When refining a pose, do the least important areas first then as you progress toward the actual capture make the final refinements on the most important areas last.
Rule 31. Avoid "90 Degree" Arms (a general rule for females.) Don Blair called these arms "Carpenter's T square arms." Gently flowing lines usually look best in portraits of women. I broke this rule in my example image of rule 25 above. In my bridal example below I followed it.
Rule 32. Don't Shoot Into a Bare Armpit. Either cover it with something or raise the opposite arm and bring the near arm down. *I've seen bare armpits covered with the young lady's long hair, flowers, toul, strips of cloth, and small props. With long sleeved clothing shooting into an armpit is usually not a problem. *In the example image I covered one with her long hair, and I heavily retouched the other. She didn't buy this image.
Rule 33. (Group Portraiture) Have the subjects at either end of the image face in toward the center. *This will keep the viewer's attention on the subjects. *I also use this technique when placing the preview images in my high school senior folios. *The images on the left side of the folio all face to the right and those on the right face left. *The master painters of the Rennaissance used this technique to keep the viewers attention within the painting.
Rule 34. Use A Telephoto Lens - Short telephoto lenses will prevent foreshortening (covered in rule # 23) which is where objects nearest the lens will appear larger than objects farther away.* Use of a short telephoto lens in group portraiture will make all the faces approximately the same size regardless of whether they are in the front row or the rear row. I used a short telephoto lens in virtually every one of the images in this tutorial.
Rule 35. Avoid Posing A Bride Kneeling on the Floor.* The wedding gown is designed to look correct and usually flows beautifully and therefore photographs best when the bride is standing.* A bride seated on a posing stool for a head and shoulders image or for a waist up or 3/4 length shot is of course perfectly acceptable.
Rule 36. Hand Placement. Use good taste in the placement of hands. The hand(s) of the client should not disappear between his or her legs and the hand(s) of a young lady should not be placed on top of either of her breasts, nor should a young man's hands be on the buttocks or breasts of the female client. When photographing hands watch that the middle finger doesn't protrude out further than the rest of the fingers.
Benji
As mentioned earlier, these "rules" are really guidelines. Once you know them you can judiciously break them.
Ok , since posting this john Domeney gave this suggestion ..... we'll call it.....
Rule 37.
Another rule I try to use is identify the clients larger eye, there is almost always a slight difference in size, and put it further away, so both eyes appear to be similar size.
You can imagine the effect if you put it the other way around.
This article was submitted by Steve Webb ["songman45"] of Photocamel.com . You can view his website here .
So many times I read responses to critiques that include a statement similar to this, “I know what I should do, but when I pick up the camera, everything I know suddenly evaporates.”
I am a portrait photographer by education and experience so much of what I have to offer here has to do with that genre but most holds true to making photographs in general. Most folks agree that creating a photograph is a complicated task and is a difficult one to learn. Those same folks think nothing of walking across the room and the number of precise calculations, the amount of balance and coordination required. My mom plays the piano. She encouraged me to take piano lessons as a child; I never did. I never wanted to learn scales, found written music impossible and could not play a song. I wanted to make music, not learn it. There was way too much involved and gratification did not happen quickly enough for me. I pursued photography instead.
Rules suck ! Portraits! How confounding! There are 40 rules. First I hate rules; nobody is going to tell me what to do. Second, I give up I’ll use them after all.
Good grief, though, all this stuff is crowding my brain. When do I get to take the stinkin picture already? Lighting, lighting, lighting- there is the quantity, quality and something about ratio and degree of incidence equaling the angle of reflectance and some jabbering about the inverse square thingie. Body angles, body axis, camera axis, posture, eye-nose direction,
perspective, posture – who dreamed up all this stuff? How am I supposed to remember all this garbage and still take the dang picture already? Camera elevation, lens distortion, image compression, depth-of-field, field of view, focal length, aperture, ambient light, shutter speed – Look all I want to do is take one simple little picture. Can we get on with it for cryin out loud? And that’s only slightly exaggerated to make a point. You probably do not remember the frustration in learning to walk. You do not know how you learned but if you can do it you learned. Observe a baby learning to take the first steps and you will be looking at reflection of your past. How many falls, how many stumbles, how many tears of frustration will there be between that first assisted pull-up and successful motivating about? What’s more how long will it take to accomplish this, a few months, a year? Not long if your life span is 20 years but ¾’s of a lifetime if you are only one year old. Isn’t it systematic? Can’t you predict the progress by the performance? It begins generally with rolling over, then crawling, pulling up comes next, holding on for balance, then tottering and plopping finally walking and running (its that stopping thing that’s hard to master, I think). Making portraits is no different. Human beings are creatures of habit. Develop habits rather than making the task a group of seemingly unrelated conscious thought processes and memory exercises. Be systematic in the approach of habitual actions. Every step you take should lead you to the next step and your own actions should prompt you to the next.
Planning :
Remember the 6 “Ps”, Proper Prior Planning Prevents Poor Procedure. The preparation begins far before you introduce a subject to the shooting area. This is the time you do the gear head work. This is rough-in time, if you know anything about construction. Check the equipment, make the initial settings and meter the lights now. You have established the subject area so get everything except the subject in place. You’ve had time to decide on backgrounds, props, and have some idea about what posing you are going to utilize. If you have to scratch your head and ponder, do it now before the sitter comes in. If you don’t seem to know what you are doing your subject will assume you don’t and will loose confidence in you from the start. This can come back to haunt you in the proofing session later. Somewhere down the line a customer who doesn’t like themselves in pictures will say, “I knew they would be terrible; that photographer didn’t know what he was doing.” Part of what the customer is paying for is the experience whether or not you realize it.
Habits : Habits are good. You don’t want to lock yourself into cookie cutter pictures; so, only make things habitual that are constants. One thing that is pretty consistent is the subject being 5 or 6 feet from the background; Another is turning the subject roughly 45 degrees from the camera axis. Want two fewer things to think about? Mark a “T” in the middle of the floor (I use black masking tape) 5 or 6 feet out from the background. Point the base of the “T” straight down the camera axis. You’ve now got a consistent subject spot and a built in protractor to find 45 degrees on both sides of the camera (if you have some visualization skill you also have the opposite angles for shooting over-the-shoulder poses). I like to save steps. So I put marks on the floor for the very most basic lighting set up. This is nothing special. It’s a metered broad lit scheme. For more reasons than I can explain I open every session with a broad lit head-and-shoulders shot on an adult and the same lighting but full-length on a child. Its an insurance shot for children, more later. For teens and adults this is a warm up but not wasted shot. They come in, sit with very few complications and just an instruction or two, turn the head, tilt and pop; one in the can. This is made quite effortless for the sitter. That’s what they think. Do everything with and for a purpose. Have a beginning, a middle and an end to your sessions. Here’s what happened in the first pose that the sitter did not know: I use a posing stool that is height adjustable (and not spongy) and has feet rather than wheels. Its placed just out of the way off the subject mark. When the sitter comes in the room I check for baggage and have a place to unload it. Then I place the stool off the mark so the face will be over the mark, not the subject’s rear end. As I move the stool I’m also setting the elevation. I want the subject seated on the edge with the knees lower than the hips. This helps with posture and also discourages swaying the stool side-to-side as nervous people will tend to do. “Have a seat” isn’t enough. If the stool is just high enough the client will not plant on the middle and allow the feet to dangle, they will instinctively perch on the edge. Now I stand in front of them and say, “Turn so your feet are pointing toward mine”. This is a good evaluation tool. Occasionally someone will turn the ankles only and point the toes my direction. The ability to follow this one little instruction lets me know how things will need to proceed. I can see the “T” in the floor (after a while its importance is diminished). Now the body angle is about right and I’m standing in front of the sitter there is a purpose, observation. Methodically I scan from the head down checking for out of place hair, jewelry clasps, collars, ties all the things that are difficult to see once I go to the camera. The next step I take is to walk between the subject and the camera along the axis to see the person in the direction the camera is pointed at them. Far enough from them that they don't feel I"m in their space, but near enough to reach them, should I want to straighten a collar or turn a necklace so the clasp doesn't show .From here I am looking at them like the camera will later. This is where I get the head turned the right direction. I use my hands quite a bit to gesture directions. There are times when I have to actually put hands on a subject. I try to avoid this and the least amount of my hand touching the subject, the better. Fingertips, I’ve found work really well. Personally, I find that the index fingers laid along the lower jaw bone work pretty well for turning and tipping the head. Years of directing traffic as a cop taught me how effective specific and clear hand gestures can be. Time to take stock of where we are:
I have set-up and posed the client for the first shot. I’ve forced myself into a set of steps that are calculated and have allowed me to check the appearance of the subject (presuming it is a girl were her nails done? And does she have particularly attractive hands?). I am about to step away and go to the camera. I do not want to be here again until time to make a major change to the subject. Check the posture. If I take one hand and place on the shoulder, then place the index finger of my other hand between and below the shoulder blades and say, “sit up nice and straight”, about 99% of all people will do just fine. They will not keep this posture, but will return to it when reminded before the image gets snapped. Now that was a lot of stuff to do just to get to the camera part. How long did I take? Much less time than it took you to read it. Most likely about 15 seconds from “have a seat”; to the first shutter activation is all. Efficiency is the name of the game. Now for the last of the things that aren’t going to change drastically for the first few images. When that posture gets right and as I walk away from the subject I measure the eyes.Not really, I just landmark their elevations then get the camera slightly above it as I approach it. Fashion and action photographers may love the freedom of hand holding a camera. I’m a portrait guy, and I love a tripod or camera stand and happen to require a remote shutter release. The subject is going to be sitting on that stool for the first several if not all the shots in this sitting. So the camera on a tripod at the proper elevation will not have to be thought about again for this series. That’s a general statement. But set right it is and I’m not likely to forget and not going to shoot under the chin and up the nose by oversight. Portraits; whether formal, informal, or ultra casual are posed from the floor up.A solid foundation is a good thing. Always begin at the floor and get everything right all the way to the head. No matter what head size image you are shooting you ought to be able to shoot the full length, three-quarter, arm pose, bust pose, or head shot simply by filling the frame, moving nearer or further, or zooming in and out. This is not a book of posing just on making good habits that keep you from having to think. I talked through getting the very first pose just to put some application to where these 40 something conventions fit together and how to eliminate problems before they have to be corrected. One last thing about step-saving: Use a model and a light meter to find some general light set-ups. Set up a broad light scheme and mark spots on the floor for the stands. Then find a nice short lighting scheme.
A simple cotton cord secured to a light stand can come in handy. Measure the distance using a light meter then mark it with the cord. Make another metering for a loop-lighting and mark the distance on the string. Do the same for both fill and main. You will save a hundred steps and a lot of subject boredom. If you photograph young children you’ve no idea how helpful this can be. This stuff I toss out for what its worth. If it helps you, I’m happy. These things I use and they work for me. They may not work for you. Happy shooting! Steve
If you want to freeze action you are better off using flash than shutter speed for two reasons :
1.) Flash can do faster speeds . Most cameras these days can go to about 1/4000th sec , some to 1/8000th . Flash , with a Nikon SB800 , at 1/128th power fires as fast as 1/41600th sec .
2.) Flash can fire as fast as you need it to , shutters have a slight delay before they fire .
If you have the luxury of time then you can wait until it gets dark - or use a very dark room depending on what you will be "shooting" .
I use a sound activated flash trigger and if you click the link you will see how you can do it yourself . The main principle of capturing the action with flash is ...... not to capture the ambient lighting as well .[ Ambient is any other light that isn't flash ] . If you are photographing at night you can get a picture in moonlight . I took this picture by the light of the full moon at iso 800 , F4 and 25 seconds ......
So if you are shooting at night and use these settings it can look like daylight . Drop back to iso 200 and you get 1/4 of the light . Go from 25 seconds to 2.5 seconds and you have 1/10th of that 1/4 of the light . Now close the aperture to F16 and you have 1/16th of 1/10th of 1/4 of that light - in other words a black picture if there is no flash .
So , we choose the lowest iso , that's iso 200 on my D50 , and a small aperture [ F9-16 ]which gives us greater depth of field , cuts out the ambient , but also requires more flash power . The trouble with higher flash power is that the speeds are slower so you rather end up moving the flash as close as possible with the lowest power possible .
The Nikon SB800 has the following flash speeds ... 1/1 full output = 1/1050th sec 1/2 output = 1/1100th sec 1/4 output = 1/2700th sec 1/8th output = 1/5900th sec 1/16th output = 1/10900th sec [this is as far as the old SB24 goes] 1/32nd output = 1/17800th sec 1/64th output = 1/32300th sec 1/128th output = 1/41600th sec
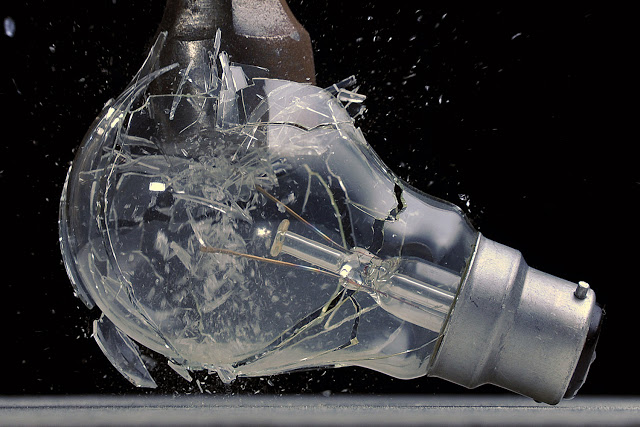
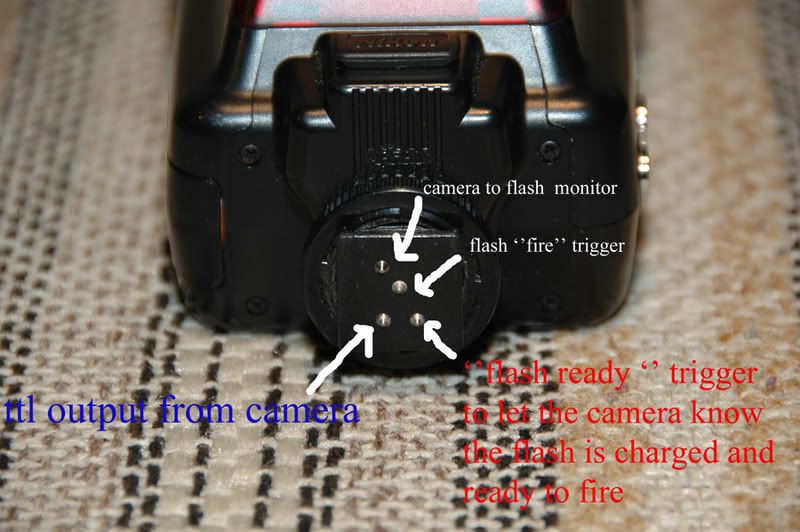
Most of the time I shoot with the old SB24 at 1/16th power [1/11000th sec ] but when I need really fast speeds , as with a light bulb breaking , I use two SB800s as close as possible at 1/128th power . Remember the inverse square law , if you move the flash twice as close it appears 4X as powerful . Once you have your 'studio' set up and your camera setting right you have to decide how you are going to trigger the flash . In the beginning I used a normal micro switch nailed to a board on a hinge
All you need to do to trigger a flash is join the centre pin to the side pin , whether it's with a relay or a switch or simply touching two wires together .
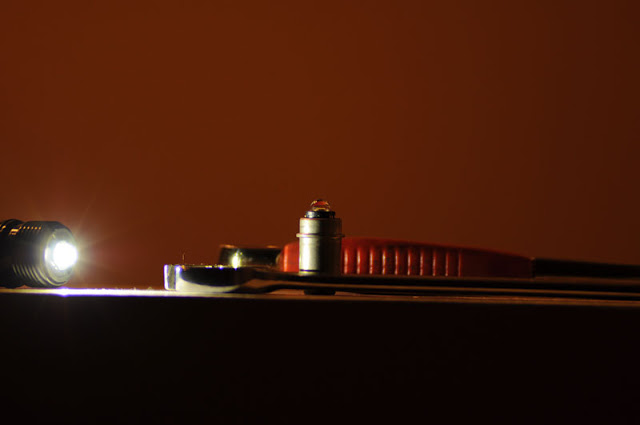
You can wire it up to a relay or toggle switch and use a sound switch or a laser trigger or motion sensor ......... whatever triggers an electronic circuit can be used to trigger your flash . The sound activated switch is the most useful to me since it can fire with a slight sound and much of what I do causes some noise :) . If it's legal where you live an air rifle makes a good noise and gives some decent effects .
First you decide what the slowest shutter speed is that you can work with without getting unwanted light in the picture . I usually need about two seconds after the shutter opens to aim and fire before the shutter closes again . At iso 200 and F11 aperture if the flash doesn't fire the image comes out black , the flash is the only light that contributes to the exposure . Once you have your settings where you want them you turn on the flash , try 1/16th power to start with - if it isn't going to be bright enough you can increase the power if you don't mind 'slower' speeds than 1/11000th sec . The other option is to keep moving the flash closer or zoom in the flash head until the image is bright enough .... before you start actually destroying anything and getting under-exposed images that could have looked stunning with the right light . The positioning of the mic is important , if it is right under the barrel the flash can fire so soon that you end up with a picture of a balloon with a hole through it , before it has time to burst .
Moving the mic 4 metres away made the flash fire too late
Moving the mic 2 metres away gave me the right 'moment' ....
Different placing of the lighting , different 'shooting' angles and 'luck' can give very different images
Anything that makes enough noise to trigger the switch can give interesting results ....
As mentioned the air rifle does a good job ..
On a wooden box a machete makes enough noise as well ...
So remember , if it is dark enough the shutter speed doesn't matter much - the flash controls the exposure . When you have your iso and aperture right choose your flash power . If it isn't powerful enough move it closer . If you don't need such a fast speed use more flash power . If you need the speed of the lowest power then you will have to zoom the flash head out [ to 85mm on the SB24 ] , move the flash as close as possible without being in the picture and then if it still isn't bright enough you will have to open the aperture up a bit more or increase the iso to brighten the image . When I use two flashes I use the SB26 with its optic trigger that fires as soon as it detects another flash ....
You can also buy a cheap optic trigger and I have tested these down to a 1/4000th sec shutter speed - that's how fast they react to another flash .
It was wet outside tonight and difficult to work with .
I was given a bullet at a hunting store today and soldered it to a piece of wire and have been trying to figure out how I can get some 'flames' coming out the end of my air rifle to 'engulf' the bullet .
I put some match heads down the barrel and another pellet in the front of the barrel and this got some smoke but was not perfect .
When there is no smoke it is easy to 'cheat' and photoshop the wire frame out but I would prefer not to have to do that - I like getting results without photoshop ....
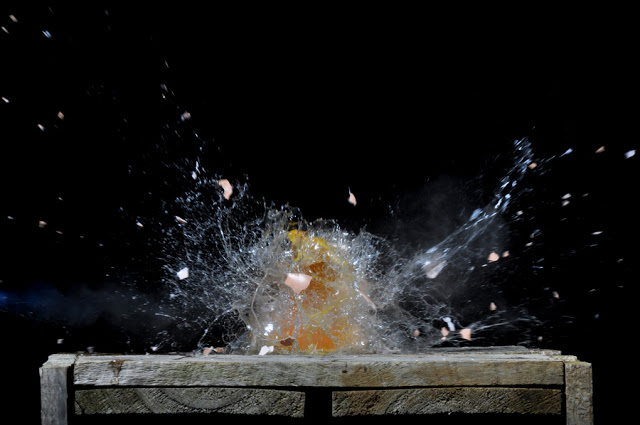
Tonight I filled some balloons with water , placed them on a mirror and shot them - carefully ! I missed the first few in fear of hitting the mirror ....
Then it got better .....
There was a red gel on the right hand flash and a blue on the left - the colour didn't show much ?
Since the days are getting shorter I decided to pull out the sound activated flash trigger again , and this time I added a mirror to see things from a different angle .
I recently bought a used Nikon SB26 in very good condition . I decided to test out the "SU4" mode on my SB800 compared to the built in flash trigger on the SB26 . With the SB800 it uses the sensor on the side , next to the battery compartment , to act as a trigger when another flash is fired while the SB26 has a separate flash trigger 'eye'
I set them up facing away from each other and made sure they couldn't trigger each other . I had another SB800 on my D50 and it was set to 1/128th power in manual mode so I had the weakest possible flash output . I tried one reasonably close [ about 8-10 metres ] . They were both set at 1/16th power .
With the lens fixed at 50mm I moved back and they both triggered ok at this distance .
I moved back a bit more until only the SB800 triggered .
Then I moved forward to where they would both trigger ....
At this stage the sun popped out from behind a cloud and only the SB26 triggered - I hadn't changed my distance .
Since I was using the D50 which has the advantage of an electronic sensor/shutter and can synch flash at any speed using 'realsynch' flash I did some extreme shutter speed tests . I mounted the old SB24 and set it at its minimum power of 1/16th and tried at faster shutter speeds .
From what I've seen so far neither system is superior in all ways . The SB26 seemed to handle sunlight better than the SB800 but the SB800 triggered at a greater distance in the shade .
On a discussion about this blog on photocamel.com I was referred to an interesting site where you can play with the settings of a virtual camera and see the results on an image on the screen . Until I do some decent sample images I think that is a very good place to start .
I've been playing around with ideas to add to a well known image . Since I never had anyone to model for me initially I had to set everything up and try to look down the lens with the mirror and hope for the best . First you set the camera to manual mode , iso 200 , 1/200th [ max flash synch mode for the D90] and then dial in aperture until it shows "-2" on the meter . The light kept changing so I was at F18 for a while , then the sun went behind the clouds and I was down to F9 , then things got bright again and I had to move to f22 ... with clouds you have to keep checking where the ambient is sitting according to the meter and make adjustments .
Of course I kept the image of my face small until I could find a better looking model ;)
Jessica is from Canada , on a working holiday in New Zealand . She also has a Nikon D90 and helped out with my last wedding . She wants to be a traveling photographer one day .
She agreed to help me after work on Sunday afternoon and I think we got some good shots . None of these images have had any photoshop work done on them , I prefer to be able to say they are straight out of the camera . [ one or two were cropped ] .
Occasionally you get a lucky accident in the background .
Jessica suggested most of the variations [ luckily]
Then there's my twist on the image . I wanted something different and while I was thinking about the prospect of someone getting their hand cut on the sharp edges [ I had put glue on the edges for safety ] , I realized that the blood could possibly look like 'sweat' and if it dripped in the right place 'tears' so after shopping around for the right colour paint I came up with "Blood: ' Sweat' and 'Tears' " . [Update: Nobody on the forums really liked these images with 'blood' in them so it was a bit of a learning experience - I got a little carried away with the concept without actually thinking about what other people might think of the final images ]
Then there were one or two others that were interesting like "Turtle-neck" [ Update : This was the unanimous favourite on 7 different forums ]
And Jessica also suggested we do a 'photographer' shot as well ....
It's not easy , having the paint in the right place , and the lighting , getting the model to line it all up properly , hold it there and get the right facial expression all at the same time - something to work on next time I suppose ! We actually ended up with better contrast with the ambient at -2.3 .[ update , even though ''-2.3'' looked good on the camera screen and the computer it printed out way too dark - next time I won't go below -1.7 for the background ]
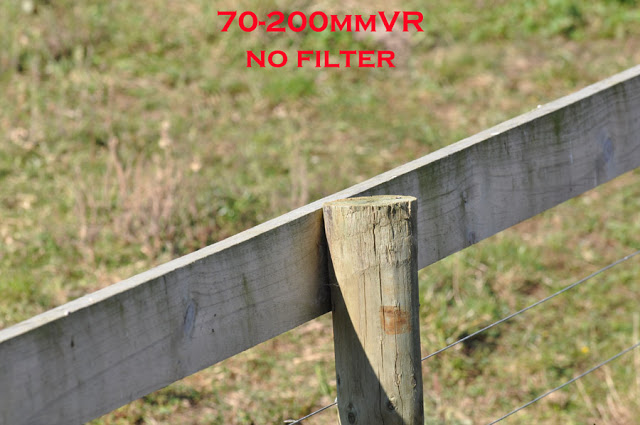
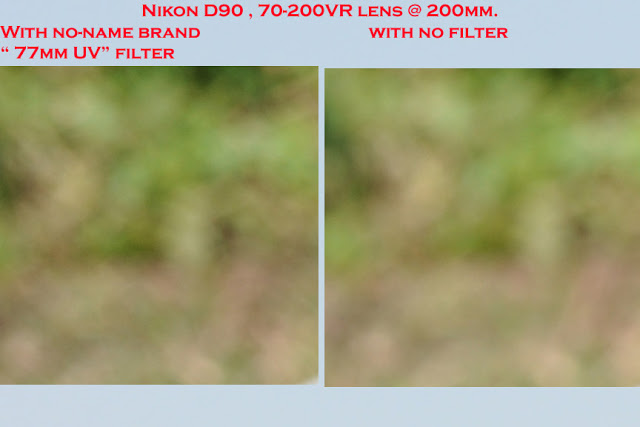
I recently read a beginners question regarding focal length and decided to put together a few comparisons for future reference . Taken with my D50 and the 18-200mm VR lens
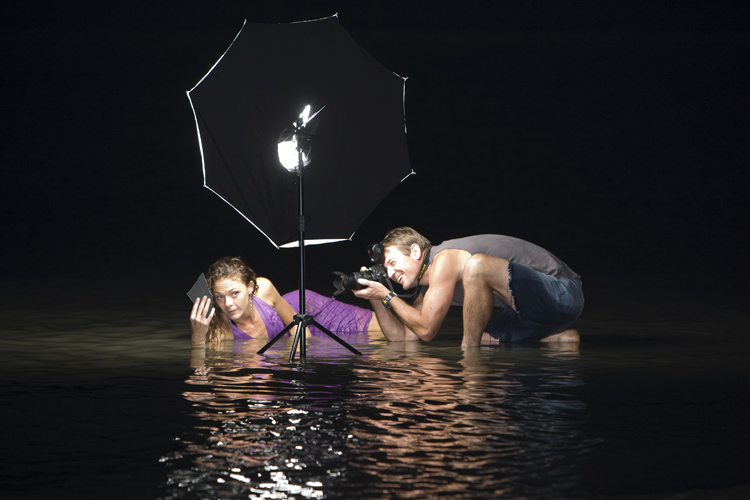
I'm in the process of trying to get a decent 'mirror shot' as on the cover of "The moment it clicks" , I don't normally like copying other people's work but thought this was a cool dea and would like to know how to do it . I started off with my 'brolly box' set up facing toward the camera as I don't have anyone to model for me so have to put up with my own face in the picture .
Then I had to hold the mirror and angle it to look down the camera lens , which is not as easy as it sounds , to get the correct 'line' - and push the shutter release .
I had bought a small oval mirror in a dinky plastic frame just to get the technique right before getting a mirror with some more 'character' . I underexposed the background by around two stops and ended up with iso 200 , 1/200th sec and F20 which greatly reduced the distance the flash could work at , especially since it was also being diffused quite a bit by the umbrella . The initial results aren't half bad and have left me with the task of finding a better looking 'subject' to model for me and then I can also 'safely' get a closer crop of the face .
I really don't like using photoshop but allowed myself to clone out a part of the picture for a different effect .
Now that I'm reasonably comfortable with the concept I am searching for a 'volunteer' for the right weather conditions . On the weekend I bought a cheap used mirror and smashed it to get some decent shapes for the contrast between soft skin and sharp glass .
I've put some glue around the edges of the pieces I like so it will be safer to hold and hopefully a decent subject will present 'herself' soon :) .
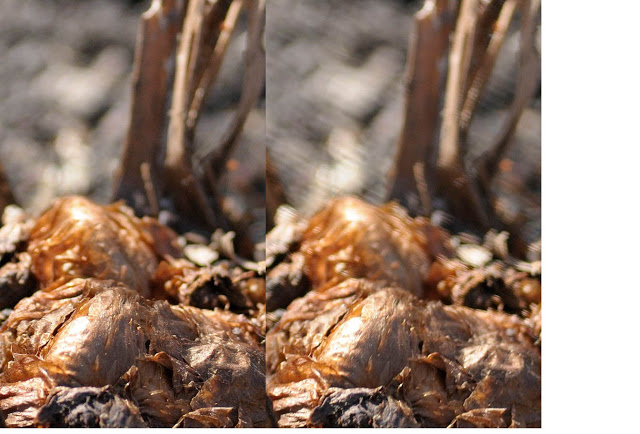
I bought a 2nd hand 300mm f4 AFS last summer to use with a PN-11 for dragonflies and the like. I used it and wondered what all the fuss was about. In fact I thought the image quality was terrible and blamed bad technique. I noticed some weird
in a shot I took of some branches while checking it out and eventually took off the filter (Optex UV) and tried again - what a difference.
I finally got around to doing a controlled test today. Below are comparison shots of some distant branches and a closeup of a soon-to-be-emerging Bracken fern. Branches were taken at f4, fern at f5.
I've noticed similar Bokeh in 300 f4 AFS shots posted here by others. I wonder if this lens in particular doesn't like filters. At some point I'll try this particular filter on another lens to see what happens.
Live and learn
Cheers,
Larry de March .
Left image without filter , right image with [cheap] filter :
{ For those of you who have contacted me and told me the images are no good because they are 'out of focus' please look up the word "Bokeh" ;) }
The issue has been brought up that these defects would be more likely to show up with longer lenses - perhaps why my test at the bottom of this page with my 18-55 lens and a cheap filter didn't show any defects .
I recently got a 180 2.8 that had a 72mm Tiffen UV filter on the on it. I don't believe in them so I took it off and haven't thought about since but I broke it out and took a test shot after reading this thread. results are subtle but are there..
. No filter : With filter :
Lens flare test :
I really didn't think it would be this dramatic or this easy to test but here are the results.
Exif Data is included.. This is a D90 180mm 2.8 wide open (hence the purple fringing), same settings on both, on a tripod, shutter triggered with the remote. Lens Hood is NOT extended. Flashlight is an LED light with the reflector removed. no PP except a resize and same sharpening on both.
No filter :
With filter added :
Added courtesy of "intruder61" of nikoncafe
Happy with my Tamron 18-270VC for a walk around lens, I picked up a Cokin filter for it.
after taking some pics at a private function and having put the filter on for the first time I noticed my focus was out . (anybody had this problem?)
So I took 2 pics, one with, one without, on tripod, same settings, at the extreme, at 270mm, 1/6 sec f6.3, no PP, just cropped.
Submitted by Bert "Newbert" Hoenigmann of nikoncafe 10/04/2010
UV filters came off of my lenses when I discovered the problem illustrated by these images one evening. This was my first real attempt at shooting the moon with my 70-300VR lens (on tripod) and I couldn't understand why the results I was getting were so soft.
I decided to remove the cheap UV filter (I think it was a Promaster) and the improvement was startling. Note: Although the exposure settings aren't exactly the same, they are close enough to illustrate the problem caused by use of the filter. Both are converted NEF's straight from the camera, but cropped to enlarge the subject (the moon).
The question was raised as to whether the filter was simply affecting the auto-focus ? Whatever , it was causing soft images somehow and had to come off .
The conversation that ensued resulted in someone providing this link to some tests on supposedly good quality filters done by
which includes 24 different filters , it's a useful read especially if you want to find a decent filter after reading this article .
So the argument has often been whether to use a filter or not .
Some state that it doesn't make sense to put a $20 filter in front of a $1000 lens but of course a flat piece of glass is easier to make than all the complicated parts of a lens .
The argument brought up in that discussion is that if you buy a decent $100 filter for your $1000 lens , and break down the components of the lens and work out how much it cost to make each component , that $100 flat piece of glass you just bought is relatively more expensive than your lens !
So if you choose to use a filter [ as I do , mainly to prevent the glass getting scratched ] , just make sure you get something decent if you want decent image quality .
9:00 pm , 9/April/2010 : Well I just fitted my new "$7" cheap filter that doesn't even have a name on it , just " 52mm UV " .
I'll do some more tests under different circumstances this weekend but for now I see no difference .
And a side-by-side 100% crop .
Perhaps I will see some faults with an out-of-focus background , for now though my main reason for using filters is to protect the front element from scratches and maintain the resale value of my lenses [ " This lens has had a filter on since new " certainly increases the resale value of a lens ] .
The matter has been brought up on the discussions that I will probably not see any issues with an 18-55 lens , more likely with a longer lens so perhaps this little 'filter scare' is more for those shooting with tele lenses .
Saturday 10/April/2010 .
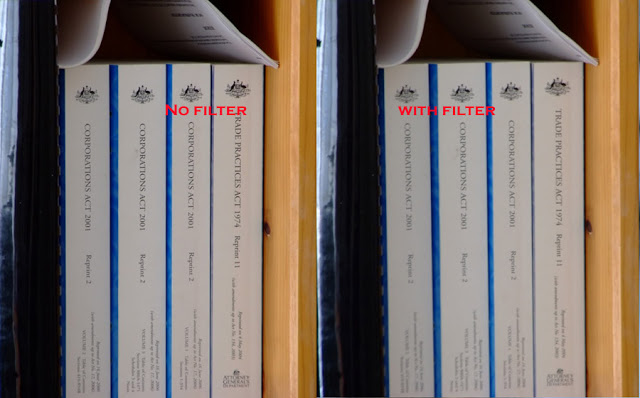
I decided to do some tests with my Nikon 70-200VR lens and the "no name brand" "77mm UV" filter that was on it .
In most of the tests I couldn't see a difference except , as with the first images on this page , with regard to the out of focus 'bokeh' in the background - the images themselves never looked much different to me .....
The real difference shows up when we take a 100% crop from the top right corner of both images and place them side-by-side .
Please note : 'VR' was turned off since it has been suggested that this can also cause similar issues .
Now you could say there is a huge difference when you are looking close up . My conclusion ? If I were shooting images for a billboard ad or perhaps a magazine cover I would take the filter
off now that I know the difference it could make when viewed close up .
But the fact is that I am not doing paid work with the lens , at normal print sizes I personally wouldn't notice the difference and I'm still learning photography - the chance of damaging the front element of a lens that cost me one month's pay is enough to encourage me to leave that cheap filter on there , until maybe I buy a better quality filter .
Something else to think about in your decision , on nikongear.com it was mentioned that most insurance claims regarding the front element of a lens are due to the glass getting scratched .... by a shattered filter ! . So if you drop your lens with the filter on there is that possibility that the filter causes damage that wouldn't have happened otherwise :) .
Opinions vary , all I'm doing is showing what could go wrong with some filters and lenses , I'm not trying to tell anyone what they should do - the ball is in your court now .
16 April 2010 : I received my new " Hoya Pro1 " lens protector [ not UV ] filter and did some tests with it to compare it with the old filter and with no filter .
There's a definite difference with the cheap filter . The difference with no-filter and the Hoya is slightly noticeable when compared side by side but I doubt I could tell them apart in individual pictures . I also lost 1/3 of a stop of exposure with each filter on the lens , I took three pictures with each filter and with no filter , 9 in all and the results were consistent .
2June 2010 - images supplied by "Robert S" of Nikoncafe ...
I just got back from attempting to go around Mount Ruapehu in a day . I only made 50 of the 72 km before having to quit due to injuries and drinking bad river water . The story with pictures from my gopro helmet cam is on my photovan blog
My friend doesn't like liquorice , I love the stuff but I can't tell him he is wrong for not liking it and he can't tell me I am wrong for liking it - opinions vary . But I just did a quick search on the topic and found that too much is toxic to the liver . Now if he tells me that I can't argue because it is a fact . It's the same with a picture you like whether you took it with your pretty pink camera or someone else took it , nobody can tell you it does not look nice - to you . They can tell you however that the horizon is tilted which is a bad mistake - unless it was done on purpose because of a personal preference . [ Maybe someone needs to eat a lot of liquorice because they have a chemical imbalance that gets fixed by it ! ] .
Also , if you are getting the results you want don't let anyone tell you your method is wrong . The greatest accomplishment in photography is to be able to dial in the settings you want and get the picture looking exactly the way you planned it without any more adjustments ! Even if nobody else likes the picture and you do - you can't get more skillful than that . but of course if nobody else likes it you may have to decide whether you just want to be an artist or adapt your style to something customers will pay for . But if you're a beginner don't defend all the pictures your camera takes just because you like it because it is a pretty pink design that goes with your hand-bag - and that applies to the ladies as well ! You may also be told that you have to eventually shoot in manual mode but if you took a picture in aperture priority mode with -1.3 EV compensation dialed in and +0.7 on the flash and got the results you were after it is nobody's business why you never shot in manual mode . Many of the purists will insist that the ultimate accomplishment is to shoot in manual - generally because they are old codgers that never had access to cameras with good auto modes in their day . I would still advise learning to shoot in manual - when you have the time to play with , but not as a first try at in important event . Also when conditions are changing quite quickly it is better to know your results are going to be 'close enough' in an auto mode as with dance photography , than to get one perfect shot in manual mode only to have every other shot totally destroyed by a sudden change in lighting . Learning to shoot in manual helps you learn a lot about photography , use it when you can , but learning how the auto modes respond to various conditions can be a lifesaver when the action speeds up . I personally hardly ever shoot in manual mode because I don't have a very good memory and might forget the camera at a setting after I have moved on - and even if I didn't there are some conditions that change too quickly for me to react fast enough in manual mode - depending on many variables of course . It's best to know how to drive a manual car and an automatic - then you are covered in all situations ..... but if you have only ever driven an automatic you don't enter a race in a manual car ! In other words don't let anyone talk you into going manual for your first wedding if you only know automatic . I go manual when I am indoors at night and my flash is controlling the exposure and when I am doing things that require certain settings like with the sound activated flash trigger and balloons [ and an air rifle ] . When things are moving faster I choose to use whatever does the job which is why I study how the different modes work - so I know which one will make similar decisions to the ones I would make . So listen to advice but don't let others steer your opinion .... unless they are your customers that you rely on to make a living .
I'm not one to rave about camera gear but occasionally something comes along that has proven itself over time and stood out from the rest - like the humble D50 ! Taken a few days ago with the D50 and 18-200VR lens ...
This image had a levels adjustment in photoshop - nothing else . The D50 produces very sharp images straight out of the camera , it has been suggested that this is because it was aimed at beginners who wouldn't know how to process the images . It is advisable to turn down the sharpening and do that later if you edit your own images .
D50 , 85mm F1.8 lens .
Many pros keep one as a second camera . I bought mine years ago when they first came out , as back-up for my original D70 . When it was time to 'upgrade' to the D80 I got rid of the D70 since the D50 had better image quality . When I bought a good used D200 I got rid of it within two weeks - mainly because it was so different to my other cameras but also because it had more noise than the D50 . I eventually traded in my D80 for two "brand new" D70s bodies that had been hidden on the shelf of a store that closed down . One of them had 1500 shots on it and the other was genuinely brand new . I got rid of them both and kept the D50 when I upgraded to the D90 . I also have a D40 now and on the local online auction sites the used D50s are commanding a higher price than used D40's - mainly due to the fact that the D50 has the focus screw-drive that the D40 lacks . If I had to get rid of one camera I would keep the D50 and part with the D40 - mainly because of the lack of a focus drive in the D40 .
One day I shot a sports event with my D50 , the battery life is rated at 2700 per charge but took mine to 3000 before putting the battery on charge .... actually the battery hadn't started showing that it was getting flat yet but it would have probably dropped quickly when it did . I carried on and shot another 1000 images with it that day - 4000 in total . Since the D50 has an electronically switched sensor/shutter rather than a focal plane shutter it can do things that no pro camera can do . I explain "realsynch flash" on another blog .
When using flash with the D50 [ and the D40/ D70 ] you have a maximum flash synch speed of 1/500th sec - as opposed to 1/200th on the D90 and 1/250th on the D300 . This gives you twice the flash power as a professional camera . The flash power itself doesn't change but the fact that you can go to a higher speed means that you can open the aperture more , or increase the iso more , which both effectively make the flash twice as strong . If you click that link to my other blog you will find out how to use the flash at any speed - and even have it working at 1/4000th sec and putting out 6X more power than a D300 and SB800 in auto-fp mode .
So : The D50 has better high iso performance than a D200 , faster flash synch speeds than any pro camera , good straight out of camera' jpeg output and is one of the few cameras that has never needed a firmware upgrade and people are selling them because they are 'only' 6 megapixels ?. Forget the megapixels , 6 is enough for almost any use - they used to shoot weddings with the 2.7 meg D1 and the 5 meg Olympus E1 so 6 meg is enough ! My trusty D50 has become my 'hack' camera which goes into the mountains with me and anywhere else I am scared to take my D90's .


 I have garnered these rules over the last 25 years as a professional photographer. Some of them have been modified somewhat by the general relaxation of posing people in the last ten to fifteen years or so.